Friday, January 25, 2013

Baked Orange-Banana Nut Donuts


To download a copy of the recipe for Baked Orange-Banana Nut Donuts, click HERE.


A warm greeting to new subscriber Raquel! Welcome!


Donuts: what a beautiful word. As treats go, if you’re thinking it’s got to be hard to beat fresh-baked donuts, you’re right. Some form of these warm, sweet delights are frequently found on Sunday mornings in the Kissing the Cook household. (That a batch of donuts can be put together for breakfast on a Sunday morning is proof of how fast and simple making them really is.) Now it’s time to share them.


Some readers got an advance look at an early version of this recipe on Facebook a couple of weeks ago. This week, it’s my pleasure to give you the upgraded version, complete with photographs.


The orange-banana flavor combination used in this recipe is one I learned – and came to love – when I was a small child and my mother would give me containers of orange-banana juice to drink. Baked donuts give it a whole new platform from which to shine. Another feature of this recipe is that it avoids being simply donut-shaped orange-banana nut bread. The flavor may be orange-banana nut, but the mouth-feel is all donut.


Some Cook’s Notes before we begin.


  • You’ll need a donut-baking pan to make these, of course, but believe me when I say it’s worth getting. I don’t know that any baking pan can change someone’s life, but a donut pan comes pretty close.

  • I used fat-free half-and-half in these donuts, but feel free to use skim milk instead.

  • In some of the photographs, you may notice that I’m mixing ingredients by hand using a spatula. This is just something I do every so often to remind myself of why it’s easier to use some kind of electric mixer. When you make these, feel free to use your hand mixer, Kitchen Aid, etc.


This recipe makes about 12 donuts.


Begin preheating the oven to 350 degrees.


Use the preheating oven to lightly toast 1 to 1-1/2 cups of chopped walnuts.


To make the batter:


Mash 2 medium bananas to a creamy consistency and set aside. (Two medium bananas should make about a cup of mashed banana.)


Blend 7 Tbsp of softened butter substitute (a firm-textured brand is best) and ¾ cup of granulated sugar.


Add 2 egg substitute eggs and mix well.


Sift in 2 cups of all-purpose flour, 1 Tbsp baking powder, ½ tsp salt, and ¼ tsp nutmeg into the bowl and mix to combine.


Add 1/3 cup of fat-free half-and-half, 1/3 cup of orange juice, and 1 tsp vanilla, and stir to combine.


Stir in the mashed bananas, and stir to combine.


To prepare for baking:


Lightly spray the baking pan with cooking spray. Put the batter in a pastry bag or a food storage bag with the corner removed. Fill each of the donut portions of the tray 3/4 full.


Bake until golden, about 16 minutes, turning the tray half-way for even baking.


When the donuts are almost finished baking, make the icing for the topping as follows:


Mix 1 cup of confectioner’s sugar and 2 Tbsp of orange juice till smooth. The mixture should be liquid, but thick enough not to be drippy.


Now let’s complete our donuts!


When the donuts have finished baking, let them rest in the baking pan for a minute or two, then remove them. (The side that was in the pan will be darker than the side that was on top. This is normal.)


While the donuts are still warm, dip the tops (the lighter-colored half) in the icing.


 Turn the iced donut with the frosting side up.


Sprinkle with the toasted nuts.


Repeat for the remaining donuts.


To download a copy of the recipe for Baked Orange-Banana Nut Donuts, click HERE. 

Now prepare to revel in the unique glory that can only be found in a fresh-baked donut!


Please visit again next week for another delicious recipe, kitchen tested and home-cook friendly for your pleasure. Till then, stay well, keep it about the food, and always remember to kiss the cook. ;-)

Saturday, January 19, 2013

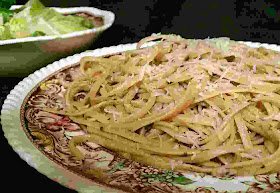
Chicken Sauce with Linguini


To download a copy of the recipe for Chicken Sauce with Linguini, click HERE.


Just to be clear, there’s nothing wrong with the classic idea of topping linguini with a well-made clam sauce. It’s just that a “classic” – whether a book, movie, song, or food – is something that, because it’s so good, has been around for a long time and is familiar and comfortable to almost everyone. I like the idea of making something good; I just want to make it in a way that’s not so familiar.


And that’s where Chicken Sauce with Linguini comes in. Rather than serving some chicken on top of a plate of pasta, this is an actual chicken-based sauce, prepared in the style of a classic clam sauce, served with linguini in much the way clam sauce usually is. The chicken sauce even looks a lot like clam sauce, due largely to the fact that chicken that’s been cut up very small bears a striking resemblance to clams that have been cut up very small. But make no mistake; the taste and aroma are distinctly chicken, and are an ideal complement to the pasta.


Since the amount of chicken used is quite small, about 4 ounces, this is an ideal way to make use of a bit of leftover cooked chicken that’s too small to be a meal by itself. If you don’t have any leftover chicken you can, of course, cook a small amount up fresh. And if you don’t feel like cooking such a small amount of chicken, using a 6.5 ounce can of canned chicken breast also works well.


This recipe makes four servings.


Finely chop four ounces of cooked chicken and set aside.


Warm 3 Tbsp of olive oil in a skillet over medium heat. Add 2 minced cloves of garlic and cook until aromatic, about 30 seconds – 1 minute.


Add ¼ cup of dry white wine (chardonnay or similar) to the skillet and cook for a few minutes till reduced to about half.


Add the chicken, ½ cup of chicken broth, 1 Tbsp dried parsley, ½ tsp dried oregano, ½ tsp salt, ¼ tsp fresh ground black pepper, and 1 Tbsp bread crumbs to the skillet. Bring to a boil, then reduce the heat to simmer for 15 minutes.


While the sauce is cooking in the skillet, drop 1 pound of uncooked linguini into a pot of salted boiling water. Cook the linguini one minute less than recommended on the package.


Drain the linguini, reserving ½ cup of the starchy pasta water. Add the linguini to the skillet and mix to combine.


Add some of the pasta water and 3 Tbsp of butter substitute. Mix until the linguini is combined with the sauce. Cook till the pasta is done.


Top with fresh grated parmesan to serve.


To download a copy of the recipe for Chicken Sauce with Linguini, click HERE.


So if you’re looking for something different for dinner, give Chicken Sauce with Linguini a try. Fresh food doesn’t get much easier than this!

Be sure to visit again next week for another home-cooking recipe! Till then, stay well, keep it about the food, and always remember to kiss the cook. ;-)


Saturday, January 12, 2013

Sweet and Sour Chicken in Puff Pastry


To download a copy of the recipe for Sweet and Sour Chicken in Puff Pastry, click HERE.


For a great combination of sweet and savory, it’s hard to beat a fresh-made sweet and sour sauce. Add it to your arsenal, and you’ll find it’s a flavor combination that’s perfect for a wide range of meals.


In this recipe, we’re using it in combination with chicken to make a delectable filling for empanadas made with puff pastry, another high-value kitchen workhorse.


Your family and guests are going to love this. And when you see how easy it is to made, you’ll be very happy yourself!  


Some Cook’s Notes before we begin.


  • This recipe is something of a departure from the reduced-fat recipes I usually post. While puff pastry is easy to use, has great flavor and texture, and is wonderfully versatile, its fat content is higher than I normally like to use. I’m currently looking into lower-fat alternatives; in the meantime, consider this a special treat recipe to be enjoyed occasionally.


  • The tasty sweet and sour sauce we make in this recipe is very simple to make. In addition to its use as a part of this recipe, you may want to keep it handy as a stand-alone recipe for use with everything from pork to shrimp to meatballs to…well, you get the idea.


This recipe makes 8 empanadas. That’s good for 6 – 8 servings.


First, we’ll cook the chicken.


Combine 1 lb. ground chicken; ½ medium onion, diced; ½ tsp Worcestershire sauce; ¾ tsp dried thyme; ½ tsp dried sage; 1 tsp salt; and ¼ tsp fresh ground black pepper in a pan and cook over medium heat until the chicken is browned. Be careful not to overcook the chicken; you don’t want it to get too dry. Transfer the browned meat mixture to a bowl and drain the fat.


To make the filling:


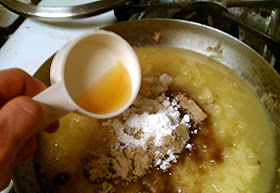
Put ½ cup packed brown sugar; 1 Tbsp corn starch; a 20 ounce can of crushed pineapple in juice (not syrup); ½ cup cider vinegar; and 1 Tbsp low sodium soy sauce in the pan you used to cook the chicken. (When adding the pineapple, include the juice as well.)

Bring to a boil, stirring constantly.


Reduce the heat to a simmer, and add the browned chicken mixture back into the pan.


Simmer for about 10 minutes, stirring occasionally.


Add one small to medium green pepper, diced, to the pan. Cover, and simmer until tender, about five minutes. When done, set the filling aside to cool.


To form the empanadas and bake the pastry:


While the filling is cooling, preheat the oven to 400 degrees.


Place a puff pastry sheet (a 17 ounce package will have two) on a floured surface. Dust the puff pastry with a little flour.


Roll the puff pastry sheet to a square, 11” to 12” on each side.


Cut the rolled puff pastry sheet into four equal squares using a knife or baker’s blade.


Place some of the filling meat on the diagonal half of one of the squares. Brush some egg wash (one egg substitute egg mixed with a tablespoon of water) onto the edges around the filling.


Fold the other half of the square over the filling, pressing the edge with your finger.


Seal the edge with the tines of a fork dipped in flour.


Brush the sealed puff pastry with egg wash.


When all four squares have been filled and sealed, place on a baking sheet lined with parchment or a silicon baking pad.


Bake until puffed and golden, about 18-20 minutes. While the first batch is baking, use the remaining puff pastry sheet and filling to prepare the other four. When the first batch has finished baking, set them aside and baked the second batch.


Serve one (or, for big eaters, two) with a vegetable.


To download a copy of the recipe for Sweet and Sour Chicken in Puff Pastry, click HERE.


And remember: although we’ve made the puff pastry into empanadas large enough for one (or, for big eaters, two) to be a meal, making these smaller will give you fantastic hors d’oeuvres or appetizers for your next gathering!


Visit again next week for another tasty, home-cook friendly recipe! Till then, stay well, keep it about the food, and always remember to kiss the cook. ;-)