Saturday, December 29, 2012

Bananas Anna


To download the recipe for Bananas Anna, click HERE.


We recently featured a recipe for Pommes Anna, the classic side dish made from sliced potatoes that have been arranged as layered petals, brushed with olive oil, seasoned with thyme and rosemary, sprinkled with grated parmesan, and baked to glorious deliciousness.


That got me thinking: Why should potatoes have all the fun?


From this beginning comes this week’s recipe: Bananas Anna, a new dessert made from sliced bananas that have been arranged as layered petals, brushed with a mixture of brown sugar and melted butter substitute, seasoned with cinnamon and nutmeg, sprinkled with toasted coconut flakes, set on a graham cracker crust, baked to glorious deliciousness and graced with dark rum sauce. Just as important, “Bananas Anna” sounds really cool when you say it out loud.


Think of it as a Pommes Anna parody you can eat for dessert.


This recipe makes six servings.


First, let’s make our graham cracker crust.


Preheat the oven to 350 degrees.


While the oven is preheating, make 1 cup of graham cracker crumbs by rolling or crushing about 8 low-fat graham crackers. (Avoid the cinnamon kind; we’ll be adding our own cinnamon and you don’t want to overdo it!)


In a bowl, combine the crumbs with 3 Tbsp sugar; 3 Tbsp plus 2 tsp butter substitute, melted and warm; a pinch of ground cinnamon; and a pinch of ground nutmeg, and mix well. The finished batter should have the consistency of wet sand.


On a baking sheet lined with parchment or a silicon pad, spread the batter out to a little more than 1/8” thick. (You’ll just need to make sure it’s larger than the pan you’ll be using to cook the bananas.) Press down using fingers or the flat bottom of a glass.


Bake for until light brown and firm to the touch, about 12 minutes, and set aside to cool.


While the graham cracker crust is cooling, we’ll make the  brown sugar sauce.


Melt ½ cup of firm-textured butter substitute in a small saucepan over low heat. Add 6 Tbsp of brown sugar and stir till dissolved.


Add ¾ tsp cinnamon, a pinch of nutmeg and ¼ tsp salt, and stir until combined. Remove from the heat and set aside till needed.


Next come the bananas.


Increase the oven to 400 degrees. Use the heating oven to lightly toast ¾ cup of shredded coconut.


Using a brush, coat the inside of an 8” non-stick pan with some of the brown sugar sauce.


We’ll do four bananas, working one at a time. Peel a banana and cut into 1/8” slices.


Place one of the slices in the center of the pan. Working around the first banana slice, arrange the next slices in an overlapping pattern.


Repeat with the next banana slices, working around the edge in an overlapping pattern. (Be careful when arranging the slices. Since the finished dessert will be turned upside-down for serving, this bottom layer will eventually be the top, so it should be done very neatly.)


Brush this layer lightly with some of the brown sugar sauce.


Repeat the above for the remaining bananas, brushing each layer and sprinkling coconut over every second layer, until all have been used. When done, press down gently to compress the banana cake slightly.


Turn the heat on to medium, and let the bananas sear till browned on the bottom, usually five to six minutes. Using a soft spatula, gently go around the edges of the pan to loosen the cooked banana cake. Place a plate or small baking sheet face down on top of the pan.


Turn the dish and the pan over together to turn the banana cake upside down, so that what was the bottom has now become the top.


Carefully remove the pan.


Gently slide the banana cake onto the graham cracker crust.


Using a knife, trim around the edges of the crust to remove any excess. Place the baking sheet with the banana cake into the oven till heated through, 5 – 10 minutes.


While the banana cake is heating, combine 1-1/4 cup confectioner’s sugar; 2 Tbsp dark rum; and 4 Tbsp skim milk to form the rum sauce.


Once the banana cake is out of the oven, garnish it with any remaining toasted coconut.


To serve:


Use a squeeze bottle to apply some of the glaze to a serving plate. Place a slice of the banana cake on top to serve. Serve warm.


To download the recipe for Bananas Anna, click HERE.


You can enjoy Bananas Anna as both an after-meal dessert and on its own as a light treat! (I also think it would make an especially fantastic surprise finish to a meal that included a Pommes Anna side dish.)


Visit again next week for another kitchen-tested, home-cook friendly recipe! Till then, stay well, keep it about the food, and always remember to kiss the cook. ;-)

Friday, December 21, 2012

Strawberry-Pistachio Holiday Swiss Roll


Season’s Greetings!

To download a copy of the recipe for Strawberry-Pistachio Holiday Swiss Roll, click HERE.
 
Although we did a dessert here only about three recipes ago, the timing seems ideal for a special treat that’s a perfect finish for your holiday dinner: Strawberry-Pistachio Holiday Swiss Roll. It’s red, green, and delicious!

Some Cook’s Notes before we begin.

  • Since the main elements of the recipe are cake batter, whipped cream, and strawberry preserves, you have the option of working completely from scratch, completely from packaged ingredients, or using whatever combination of the two that you’re most comfortable with. In the recipe below, I’ve made the cake from scratch (since I like to make things reduced-fat), and used fat-free whipped topping (for the same reason) and a jar of preserves. Feel free to substitute boxed cake mix, fresh whipped cream, or fresh preserves. (If you need a very tasty preserves recipe, click HERE.
  • Rolling the cake is not hard, but it’s delicate, and cracking is always a possibility. You’ll see in the photos that my cake had some cracking. It’s not that serious. You can cover the crack with some of the preserves (as I did) or with some other sauce, or just serve it with the attitude that, “Yes, the cake cracked when I was rolling it. Are you going to make something of it? “
  • In this presentation, I kept the serving simple (and the colors seasonal) by topping the sliced cake with a bit of strawberry preserves and some confectioner’s sugar. (As noted, topping with the preserves has the additional benefit of covering cracks that may occur in the outside of the cake while you’re rolling it.) Another option would be to create a suitable glaze. (If you’re feeling bold, try confectioner’s sugar and amaretto!)

This recipe makes one 14” long Swiss Roll (about 8 – 10 servings).


Prepare a simple syrup by dissolving ¼ cup of sugar in ¼ cup of boiling water, and setting it aside to cool. While the syrup is cooling, set out two fresh eggs, two egg substitute eggs, ½ cup of firm-textured butter substitute (don’t use a soft-textured brand) and 1 cup of skim milk till they are at room temperature. (An hour or two is usually enough.)


To make the cake batter:


Preheat the oven to 400 degrees.

Combine the whites whites of the two fresh eggs with a pinch of salt and a pinch of cream of tartar in a bowl and beat until fluffy. Set aside till needed.


Combine the butter substitute and ¾ cup of sugar in a mixer bowl and mix until creamy. (Be careful not to over-mix.)


Add the egg substitute, 1 cup all-purpose flour, 3/4 tsp baking soda, 1-1/2 tsp baking powder, and 2 tsp vanilla extract and mix until smooth.


In a small bowl, mix the skim milk with one 3.4 ounce box of pistachio pudding mix.


Add the pudding mixture and some green food coloring to the larger bowl and mix to combine.


Fold in the beaten egg whites.


To bake the cake:


Line the bottom of a 9” x 14” x ½” baking pan with parchment cut to fit. Coat the sides with butter substitute and flour.


Pour the batter into the pan. Spread the batter with a spatula, and shake to make even.


Bake for about 10 minutes, turn the baking sheet around for even baking, and bake until top is golden brown, about another 10 minutes.


Let cool on the baking sheet.


To prepare the Swiss Roll:

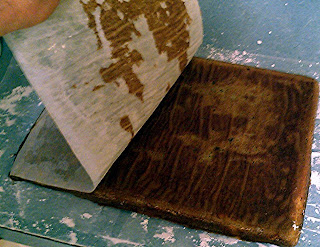
Place a piece of parchment paper a little larger than the baking pan on the counter and dust with confectioner’s sugar to prevent the cake from sticking. Carefully turn the baking pan onto the parchment paper, and remove the baking pan and parchment.

Brush some of the simple syrup on the top of the cake.


Gently spread 6 Tbsp of jam over the surface of the cake, leaving about a 1” border.


Similarly, spread ½ cup of whipped cream over the surface of the cake, again leaving a border of about 1”.


With the long side facing you, carefully roll the cake away from you. Try not to let the cake crack, but if it does, don't worry. We can work with it.


Slice into pieces about 1-1/2”wide. Garnish each slice with confectioner’s sugar and some preserves for serving.


To download a copy of the recipe for Strawberry-Pistachio Holiday Swiss Roll, click HERE.

Whatever holiday you choose to celebrate this time of year, I wish you your best one ever. And if a Strawberry-Pistachio Holiday Swiss Roll can be part of that, so much the better!

Visit again next week for another great tasting, home-cook friendly recipe! Till then, stay well, keep it about the food, and always remember to kiss the cook. ;-)


Saturday, December 15, 2012

Pommes de Terre Anna (Potatoes Anna)


To download a copy of the recipe for Pommes de Terre Anna, click HERE.


A warm welcome to new subscriber Encourage One Another!


This is my version of Pommes Anna, a classic French dish from the time of Napoleon, normally consisting of a layered cake of thin-sliced potatoes that’s covered with butter and baked till it’s crisp outside and tender inside. History is not clear about who Anna was, nor whether she should have felt complimented that an enamored French chef saw her and thought of potatoes covered with butter. For many of us, though, the most enduring mystery surrounding Pommes Anna is why the French chef – who, presumably, spoke French – gave it that name in the first place, since pommes refers to apples. Potatoes are “pommes de terre.” This title of this recipe has been adjusted accordingly.


Those pressing issues notwithstanding, this is an easy, yet classy, recipe that is made entirely of ingredients you probably already have in your pantry.


Some Cook’s Notes before we begin:

  • Garlic-infused olive oil is easy to make, but it must be prepared with care. Garlic grows directly in soil, which has naturally-occurring bacteria that can cause botulism. These bacteria are anaerobic, meaning that they thrive in oxygen-deprived environments (such as olive oil). The procedure described in this recipe is based in part on Emeril Lagasse’s “Garlic Infused Oil and Dipping Sauce.”

  • Credit to Chef Anne Burrell for proving that olive oil works as well as butter in this dish.
  • When serving, consider cutting the slices yourself. At a buffet-style meal, I recently discovered that people unfamiliar with Pommes Anna tended to scoop up the top few layers and leave the layers below for the next person. That’s fine for potatoes au gratin, in which all the layers are the same, but not for this recipe, in which some layers have ingredients the others don’t. (Since potatoes put through a mandolin can look a bit like apples put through a mandolin, you may also find yourself having to explain the pommes vs. pommes de terre thing too.)


This recipe makes an 8”x 8” baking dish of potatoes, about 4 – 6 side dish servings. (If you prefer, a 9" pie pan would work very well too.)


First we’ll prepare the garlic infused olive oil.


Cut four garlic cloves into thin slices.


In a small saucepan over low heat, warm ½ cup olive oil to around 200 degrees.


Add the sliced garlic to the oil and cook until fragrant. (This should only take a few minutes.) Be careful to avoid burning the garlic.


Remove the saucepan from the heat and let it cool. Once cool, set the oil aside for about an hour, then strain into a sterile jar. Discard the cooked garlic.


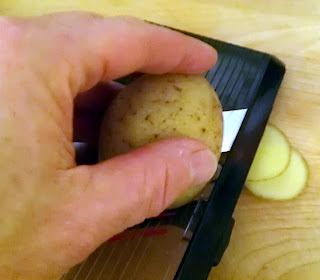
Now we’ll work on our potatoes. They need to be sliced thin; a mandolin is recommended.


Preheat the oven to 425 degrees.


Grate 1 cup of parmesan cheese.


Lightly coat an 8”x 8” baking dish with some of the olive oil.


Rinse and dry 2 pounds of Yukon Gold potatoes. Working one potato at a time, and working quickly to prevent oxidizing of the potatoes, slice the potatoes to about 1/8” thick in a mandolin.


Pat the potato slices dry with paper towels, and place one of the slices in the center of the baking dish.


Working around the first potato slice, arrange the next slices in an overlapping pattern.


Repeat with the next potato slices, working around the edge in an overlapping pattern. (Be careful when arranging the slices. Since the finished dish will be turned upside-down for serving, this bottom layer will eventually be the top, so it should be done very neatly.)


Brush this layer lightly with some of the olive oil.


Repeat for the second and third layers of potato slices, pressing down gently on each layer as it is completed to compress it. After the third layer has been brushed with oil, season with salt, pepper, ½ tsp dried thyme, ½ tsp dried rosemary, and half of the parmesan.


Repeat the above for the remaining potatoes until all have been used.


To bake the potatoes:


Cover the baking dish and bake for 30 minutes.


While the potatoes are baking, prepare a baking sheet lined with foil or a silicon baking sheet. If using foil, lightly brush the foil with some of the olive oil.


Uncover the baking dish and run a knife around the edge to prevent sticking.


Place the baking sheet on top of the baking dish.


Turn them over together to invert the potato cake onto the baking sheet.


Leaving the potato cake uncovered, bake until browned and crisp on the outside, about another 30 minutes.


Slice and serve warm or hot.


To download a copy of the recipe for Pommes de Terre Anna, click HERE.


Whether you decide to call it Potatoes Anna, Pommes Anna, Pommes de Terre Anna, or anything else, this is a delicious and classy side dish that’s surprisingly easy to make. Enjoy!


Hope you return next week for another great recipe! Till then, stay well, keep it about the food , and always remember to kiss the cook. ;-)