Special Announcement
Once upon a time, fueled partly by watching aspiring
food-show hosts presenting their show concepts on The Next Food Network Star
and thinking about what mine might be; partly by reading “Beard on Food,” a
collection of the great master’s weekly newspaper columns; and partly by the
ego-bruising realization that almost all of the recipes in my thick recipe
notebook had other people’s names on them, I set some goals: begin creating my
own recipes; share those recipes on a new blog that would make process and how
the food makes you feel as important as how the food tastes; get disciplined
enough to do the above on a weekly deadline; and keep all of that going for
three years.
That was in August of 2010 - three years ago. I’ve met those
goals, and another I hadn’t expected: gotten
to know wonderful people, some of whom have become quite dear to me (you all
know who you are), and to all of whom I am very grateful for your kind
acceptance and endless encouragement of my efforts. The time commitment has
been great, and that’s ok; when life treats you well, it gives you the
opportunity to work hard at something you deeply love to do. And so it is with
great pride and great gratitude that, going forward, I’ll now be changing over to
posting recipes on an occasional basis, rather than on a weekly basis. (You
knew I couldn't give this up completely. :-) )
Now let’s cook!
Baked Alaska Flambé
To download a cookbook style copy of the recipe for Baked
Alaska Flambé, click HERE.
 Baked Alaska may sound like a complicated dessert dish. In
reality, it couldn’t be simpler: caked topped with ice cream, covered in a
basic meringue and briefly browned in the oven.
To make it even better, in this recipe we reduce the fat by
replacing the ice cream with low fat frozen yogurt, and baking a simple,
reduced fat pound cake to use as the base. The pound cake is the only part of
the whole process that involves any real cooking, and if you’re truly determined
not to cook, you can even buy a pound cake already made. (Of course, a
purchased pound cake is probably not going to be low fat.) In fact, the process
of making a Baked Alaska is almost like that of making a salad: you don’t cook
it, you assemble it, hopefully with some finesse. Although it takes most of a
day to make, don’t be put off; what you’re really doing is putting a few simple
things in a bowl, placing the bowl in the freezer for a few hours, doing some
more simple things to it, putting it back in the freezer for a few hours, doing
some more simple things to it, putting it back in the freezer for a few hours,
and then baking it for five minutes.
You can, of course, serve Baked Alaska right out of the oven
and have a wonderful dessert, but you (and your guests) would be missing half
the fun. Few things get and hold
people’s attention as effectively as does setting their food on fire, so this
recipe also shows you how to put your special dessert over the top with a flambé. (There’s no need to worry about the flambé
burning the meringue. Research at Cornell University found that, although the
temperature of the flame itself can be quite hot, the surface temperature of
the food under the flame never exceeds the boiling point of water, which is not
high enough to cause additional browning. For a look at the science behind the process, check out this great article: http://grapesandwine.cals.cornell.edu/appellation-cornell/issue-10/student-focus.cfm.)
Some Cook’s Notes before we begin:
- It is important that the pound cake ingredients be at room temperature as described; otherwise, the cake can get too heavy.
- If using 80 proof rum (or any other 80 proof liquor), heating it in a shallow pan before trying to set it aflame is very important to doing the flambé. Higher alcohol liquors, such as 151 proof rum – can be ignited at room temperature. Liquors that are 80 proof need to be heated before they’ll flame. (The alcohol content of beer and wine is too low for either of those to be used in a flambé.)
- Aside from it being easier to ignite as noted above, 151 proof rum will burn longer than 80 proof liquors because of its higher alcohol content.
- If serving the Baked Alaska with the flambé, be sure to have a clear path to the serving table before lighting the rum.
This recipe makes about eight servings.
Here’s what you’ll need:
For the filling: 40 reduced-fat vanilla wafers; 1 pint low-fat cherry frozen yogurt (or other desired flavor); and 1 pint low-fat blueberry frozen yogurt (or other desired flavor).
For the pound cake: 2 cups sugar; ¾ cup firm-textured butter substitute, room temperature; 1-1/2 cup AP flour; ½ cup pastry flour; 2 tsp baking powder; 1-1/2 tsp vanilla extract; juice and zest of 1 lemon; 1 cup fat-free Greek yogurt, room temperature; 5 egg substitute eggs, room temperature.
For the meringue: 3 egg whites (from fresh eggs, not egg whites from a carton); pinch of salt; 6 Tbsp sugar; pinch of cream of tartar; ½ tsp vanilla.
For the flambé (optional, but highly recommended for a strong serving effect): ½ cup rum (151 proof is recommended, but 80 proof will work too)
Let’s start
by preparing the pound cake.
Set the butter substitute, egg substitute and Greek yogurt out for about an hour to get to room temperature.
Using an electric mixer or stand mixer with the paddle attachment, mix the sugar and the butter substitute until creamy.
Pour the batter into a buttered two-pound loaf pan.
Bake until browned on top and a toothpick inserted in the middle comes out clean, about 1-1/2 hours, turning the pan half-way for more even baking. When done, set aside to cool completely.
While the
pound cake is baking, prepare the filling as follows:
Line a 2-1/2 quart bowl with foil. Put the cherry frozen yogurt into the lined bowl and press the surface until even.
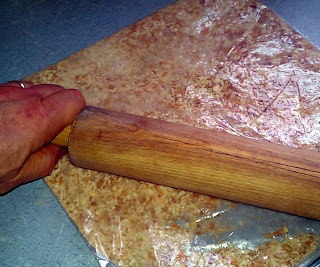
Cover the top with the other half of the vanilla wafer crumbs. Place the bowl in the freezer for about two hours until frozen hard.
When the
frozen yogurt in the bowl is hard, prepare the cake base as follows:
Slice about half of the pound cake into 1” thick slices. (If you need more pound cake to make the base, just cut one or two additional slices.) Remove the crusts from the pound cake slices. (Save the cut crusts for a snack later; nothing goes to waste!)
Cutting the pieces as needed to fit, place them on top of the frozen yogurt in the bowl to form the cake base. Be sure the entire top surface is covered with pound cake. Place the bowl back in the freezer for another two hours.
When it’s
almost time to take the bowl out of the freezer again, start preparing the
meringue.
Place the egg whites and salt in a chilled bowl and beat with chilled beaters until very stiff peaks form.
Add the cream of tartar and vanilla, and beat until stiff.
To apply the meringue:
Line a baking sheet with parchment.
Place the lined baking sheet upside-down on top of the bowl with the frozen filling.
Turn the bowl and baking sheet over together so that the baking sheet is now on the bottom and the upside-down bowl is on top.
Use a spatula to apply the meringue to the top and sides of the cake assembly.
Be sure to bring the meringue all the way down to the parchment. Place in the freezer for at least two hours. (The meringue will get firm, but will not freeze solid.)
To finish the Baked Alaska:
Lightly score the surface of the meringue by gently running the tines of a fork in each direction. Place the Baked Alaska in the oven until the meringue is lightly browned, about five minutes.
The Baked Alaska can now be sliced and served as is. For a more
dramatic serving, prepare the flambé as follows:
Pour the rum into a shallow, heat proof pan. Only if you’re using 80 proof rum, warm the rum in a small, shallow pan to 110 degrees, the temperature of moderately hot tap water. (Do not warm 151 proof rum.) Light the rum on fire and carefully pour or spoon a little over the Baked Alaska. Turn down the lights, and serve immediately while flaming.
To download a cookbook style copy of the recipe for Baked Alaska Flambé, click HERE.
I’ll see you again with more great tasting, home-cook
friendly recipes some time in the future, so be sure to keep an eye
out here or, better yet, you can send a Friend Request to me on Facebook at Kissingthecook
Recipes.
Every week for the past three years, I’ve closed each post
by asking you to stay well, to keep it about the food, and always to remember
to kiss the cook. By all means, keep doing so. But this time, the cook – this one,
at least – with heartfelt thanks to everyone who has been part of this glorious
adventure in food and life itself - wants to give you a big kiss right back.
Happy cooking!


