Saturday, March 30, 2013

Coconut-Almond Macaroons with Apricot Topping


To download a cookbook style copy of the recipe for Coconut-Almond Macaroons with Apricot, click HERE.


It seems fair to say that the macaroons with which most people are familiar are the pasty, bland kind that are mass-produced and sold in cans. And that’s a great shame, because really outstanding macaroons – soft, sweet and flavorful – are one of the easiest treats you can make in your kitchen.


Not to be confused with macarons, their meringue-based French cousins, macaroons are coconut, beaten egg whites, sugar and (usually) chopped almonds combined with a few other simple ingredients to make a delicious can’t-eat-just-one delight. And this week’s recipe goes even further and adds the unusual (and highly yummy!) topping of apricot preserves. (It’s also worth noting that one simple ingredient swap turns these macaroons from a year-round treat to a perfect Passover cookie better – and less expensive - than any you can buy.)


Here are the ingredients you’ll need: 3 Tbsp flour (for Passover use Passover Cake Meal); ½ tsp salt, divided; ¾ cup sugar; zest of one orange; 3 egg whites; ¾ cup chopped or crushed almonds; 2-1/2 cups shredded coconut; and ½ cup apricot preserves.


This recipe makes about twenty-one 2” macaroons.


Preheat the oven to 350 degrees.


In a bowl, combine the flour (or cake meal), ¼ tsp salt, sugar, and 1 Tbsp orange zest.


In another bowl, combine the egg whites with the remaining ¼ tsp salt. Beat until firm peaks form.


Add the flour mixture, a little at a time, to the beaten egg whites, mixing thoroughly after each addition.


When all of the flour mixture has been incorporated into the beaten egg whites, fold in the coconut and almonds.


Drop heaping tablespoons of the mixture onto a baking sheet lined with parchment or a silicon baking pad.


Using a wet finger, form a well in each piece.


Bake for about 18 minutes or until lightly browned, turning the baking sheet half-way for even baking. When turning the baking sheet, sprinkle the remaining zest on the partially baked macaroons.


Let the macaroons cool on the baking sheet for two minutes, then transfer to a cooling rack.


When the macaroons have cooled completely, fill each well with apricot preserves. (The macaroons will save well in an air tight container for a week.)


To download a cookbook style copy of the recipe for Coconut-Almond Macaroons with Apricot, click HERE. 


The best part is that after your this batch gets eaten up - and they will - it's easy to make more!

Thanks for visiting. Be sure to come again next week for another great recipe! Till they, stay well, keep it about the food, and always remember to kiss the cook. ;-)

Saturday, March 23, 2013

Mediterranean Style Dinner Plate Part 2 – Roasted Red Pepper Hummus and Eggplant in Honey Garlic Sauce


To download a copy of the recipe for Roasted Red Pepper Hummus, click HERE.


To download a copy of the recipe for Eggplant in Honey Garlic Sauce, click HERE.


Last week, we presented Part 1 of a two-part vegetarian “Mediterranean Style Dinner Plate” concept, a unique, easy-to-make meal packed with both taste and nutrition. (To see last week’s recipes for Israeli Couscous with Roasted Tomato and Olives Topped with Oven Fried Falafel Patties, click HERE.) This week, as promised, we present Part 2, Roasted Red Pepper Hummus and Eggplant in Honey Garlic Sauce. They’re great by themselves, and when combined with last week’s food offering and some pita bread, make a meal that’s filling, healthy, and even colorful!


Some Cook’s Notes before we begin:


  • For making the roasted red pepper hummus you can, of course, elect to buy a jar of roasted red peppers. In this recipe, we’ll be making our own. (I’ve never been sure why, but this has always felt to me like one of the most fun things to do in the kitchen.) When roasting one red pepper, it’s usually easier to do it directly on the stove burner. Since this recipe calls for two, we’ll use the broiler instead.


  • Similarly, you can buy tahini but we’ll make our own. This recipe makes about twice as much tahini as you’ll need to make the hummus. The rest can be refrigerated in an air-tight container for up to three months, or used with the falafel we made last week as part of the same dinner plate.


  • We’ll be using a food processor to make the tahini and the hummus. In the photos accompanying the recipe below, I used a mini-processor and worked in batches, only because it was handier for me to get to. If you have a full size food processor, by all means use it.


This recipe makes four servings.


You’ll need the following ingredients.

  • For the hummus: 2 red bell peppers; tahini (1 C sesame seeds; ¼ cup olive oil; 2 tsp fresh squeezed lemon juice; 6 Tbsp plain, fat-free yogurt; and ½ tsp salt); 1-3/4 cu canned chickpeas, drained and rinsed; 2 Tbsp fresh lemon juice; 2 cloves garlic, minced; 3 Tbsp chopped onion; ½ tsp cumin; pinch cayenne pepper; salt and pepper to taste; pita bread; and garnish (2 Tbsp dried parsley; and olive oil for drizzle).

  • For the eggplant: sauce base (¾ cup vegetable stock; 1-1/2 Tbsp white wine vinegar; 1 tsp honey; pinch ground ginger; pinch fresh ground black pepper); 4 cloves garlic, minced; 1 tsp cornstarch; 1 Tbsp honey; 1 Tbsp white wine vinegar; 1 eggplant (about 1 pound); olive oil for sautĂ©; ¼ cup vegetable stock


Like most cold-mix foods, hummus tastes even better when it can rest for a while – even overnight – while the flavors all get to know each other. Let’s do that first, starting by roasting the red peppers.


Preheat the broiler to high.


Wash and quarter the peppers. Place them skin-side up on a foil-lined baking sheet. (Use foil, not parchment. The peppers won’t stick, and we’ll need the foil for part of the roasting process.)


Place the baking sheet in the oven under the broiler until the skin is blackened. (It will take a few minutes, so keep an eye on it.)


After the skins have blackened, seal the peppers inside the foil and let them rest for about 30 minutes while steaming in their own moisture.


While the peppers are resting, let’s make our tahini.


In a non-stick pan (or in the oven at 350 degrees) toast the sesame seeds for 5 – 10 minutes until golden brown. Let cool for 15 minutes.


Combine the sesame seeds with the olive oil in a food processor and puree until creamy, about 90 seconds.


Transfer the tahini to a bowl and separate into two equal portions. As noted above, one portion will be used to make the hummus; the other can be stored, or used to top the falafel we made in last week’s recipe.


With the tahini made and the red peppers rested, let’s make our hummus.


Open the foil packet and peel the skins from the roasted peppers. (The skins should remove easily.) Cut the peppers into pieces small enough for the food processor.)


Combine the tahini, chick peas, lemon juice, garlic, red peppers, onion, cumin and cayenne pepper in a food processor and puree to desired consistency, about 1 – 2 minutes.


Add salt and pepper to taste. Set aside till ready to serve.


Now we’ll start the eggplant.


Combine sauce base ingredients in a small saucepan.


Bring to a boil, add the garlic, then simmer till reduced by half (about ¼ cup).


Remove the saucepan from the heat. Add the cornstarch and mix well to avoid clumping.


Add 1 Tbsp honey and 1 Tbsp white wine vinegar and mix well. Set the sauce aside till needed.


Trim the top and bottom from the eggplant, and slice in half lengthwise. Slice each half into ¼” thick pieces.


Heat a little olive oil in a large pan, and place the eggplant pieces in the pan. Heat until lightly browned, about 2 minutes, stirring occasionally.


Add ¼ cup of vegetable stock, cover, and let the eggplant steam over medium-low heat until cooked through, about 10 minutes.


(My large pan doesn't have a cover, so I used a baking pan.)


Turn the heat off under the eggplant. Add the sauce and mix to combine.


To serve, plate some of the hummus (topped with parsley and olive oil), get some of the eggplant in sauce on the side, and serve with sliced pita bread for the hummus. (Of course, if you also wanted to have some of the Israeli couscous and oven-fried falafel we made in last week’s recipes, that would be even better!)


To download a copy of the recipe for Roasted Red Pepper Hummus, click HERE.


To download a copy of the recipe for Eggplant in Honey Garlic Sauce, click HERE.


Enjoy in good health!


Be sure to visit again next week for another tasty recipe that’s kitchen-tested and home-cook friendly. Till then, stay well, keep it about the food, and always remember to kiss the cook. ;-)


Saturday, March 16, 2013

Mediterranean Style Dinner Plate Part 1 – Israeli Couscous with Roasted Tomato and Olives Topped with Oven Fried Falafel Patties


To download a copy of the recipe for Israeli Couscous with Roasted Tomato and Olives in cookbook-style format, click HERE.


To download a copy of the recipe for Oven Fried Falafel Patties in cookbook-style format, click HERE.


Although it’s great either by itself or as a side dish, this week’s recipe post for an Israeli couscous with roasted tomato and olives, served with oven-fried falafel patties, is Part 1 of a two-part vegetarian “Mediterranean Style Dinner Plate” concept. The remaining items on the plate will be presented as Part 2 next week.


The idea behind the plate is simple: I wanted to put together a unique, easy-to-make meal packed with both taste and nutrition. For all of those things, it’s hard to beat Mediterranean style ingredients. This week we’re taking Israeli couscous, with its delicious pearly texture, and topping it with falafel patties whose chickpea goodness has been made even healthier by oven-frying instead of the usual pan-frying.


This recipe makes four servings.


You’ll need the following ingredients.

  • For the falafel: 1-3/4 cups (15 ounces) canned chickpeas, drained and rinsed; 1/2 cup of onion, diced; 3 garlic cloves, rough-chopped; 1 tsp fresh squeezed lemon juice; 1 tsp ground cumin; 1 tsp ground coriander; ¼ tsp red pepper flakes; 3 Tbsp dried parsley; 1 tsp salt; pinch fresh ground black pepper; ½ cup AP flour; breading station (1/2 cup AP flour, 1 egg-substitute egg, 1/2 cup plain dry bread crumbs seasoned with ¼ tsp each of salt, ground cumin, and ground coriander); cooking spray; and tahini (optional for garnish).
  • For the couscous: 1 pint grape tomatoes, halved; ½ tsp salt; 2 Tbsp olive oil; 1 cup uncooked Israeli couscous; pinch of ground cinnamon; 1-1/2 to 1-3/4 cup vegetable stock; ¼ cup small green olives, quartered; 1-1/2 Tbsp dried parsley; and 1 tsp dried basil.


Begin pre-heating the oven to 400 degrees.


To make the falafel mixture:


Place the chickpeas, onion, garlic and lemon juice in a food processor.


Process until coarse.


Add the cumin, coriander, red pepper flakes, parsley, salt and pepper and process until smooth.


Transfer to a bowl. Add enough of the flour, a little at a time, to give the mixture a consistency similar to a sticky dough.


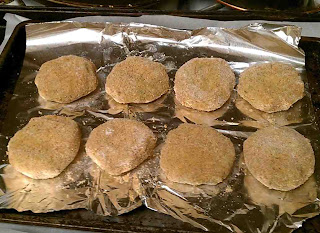
Transfer the mixture onto a work surface and cut in to eight equal pieces. Form the pieces into balls about 2” in diameter. Press the pieces slightly to flatten to about ½” thickness.


To prepare the breading station:


Place flour in a bowl or plastic bag; the egg-substitute in a bowl to the right of the flour; and place the seasoned bread crumbs in a bowl or plastic bag.


To bread the falafel, working one piece at a time:


Dredge the piece slice in the flour to coat.


Dip the piece in the egg-substitute till coated. Shake off the excess.


Place the coated piece into the bread crumb bag and toss to coat.


Place each coated piece onto a baking sheet lined with parchment or a silicon baking sheet, and let rest in the refrigerator for 15 – 20 minutes.


While the falafel pieces are in the refrigerator, start preparing the couscous.


Place the tomatoes, skin side down, on a baking sheet lined with parchment or a silicon baking pad. Season with the salt. Roast the tomatoes until well cooked, about 20 minutes.


While the tomatoes are roasting:


Begin bringing 1-1/2 cups of the vegetable stock to a boil in a small saucepan.


Heat the olive oil in a non-stick pan over medium-low heat and add the couscous and cinnamon. Heat until lightly toasted, about five minutes, stirring often.


Add the couscous to the hot vegetable stock.


Cook until the liquid is absorbed, about 8 – 10 minutes, stirring often, reducing the heat to low for the last two minutes. If necessary for the couscous to cook completely, add the remaining ¼ cup of stock.


Add the tomatoes, olives, parsley and basil, and mix to combine. Set aside till ready to serve.


When the falafel pieces are ready to bake:


Spray them with cooking spray.


Bake for about 12 - 14 minutes until lightly browned. Turn the patties over, spray again, and reverse the position of the baking tray for even baking. Bake for another 12 - 14 minutes until the falafel is cooked through and the coating is crisp.


Serve the falafel on the couscous, with an optional "shmear" of tahini spread on top.


To download a copy of the recipe for Israeli Couscous with Roasted Tomato and Olives in cookbook-style format, click HERE.


To download a copy of the recipe for Oven Fried Falafel Patties in cookbook-style format, click HERE.


Be sure to visit again next week for Part 2 of the Mediterranean Dinner Plate: Roasted Red Pepper Hummus, and Eggplant in Garlic and Honey Sauce. (Or, as they used to say in the movie serials, “To Be Continued…”) Till then, stay well, keep it about the food, and always remember to kiss the cook. ;-)