Saturday, April 28, 2012

Reduced Fat Fettuccine Alfredo with Grilled Shrimp and Broccoli


To get a copy of this recipe, just click HERE.

Some variations exist, but most sources agree that Fettuccine Alfredo was invented by Alfredo De Lelio,  owner of Ristorante Alfredo alla Scrofa in Rome, around 1914. With his wife experiencing a difficult pregnancy, De Lelio was trying to put together a dish she could keep down. Eventually he tried a very rich combination of butter, cheese and pasta that Mrs. De Lelio not only held down, but also loved so much that it was quickly added to the menu at his restaurant. (The part I’m not sure whether or not to believe came next, when the honeymooning Hollywood power couple Douglas Fairbanks and Mary Pickford, the Brad and Angelina of their day, supposedly went to Alfredo’s restaurant and had the dish, which at the time he called “Fettuccine al Triplo Burro” (triple-butter fettuccine). The resultant news coverage became instrumental in the dish crossing the ocean to America, and a new culinary star was born.

And what a delicious dish it is! The catch, of course, is the high fat content of traditional Fettuccine Alfredo. Since having to start cutting back on fatty foods several years ago (resulting in my own interest in low-fat cooking), it has been the meal I’ve missed most.  I finally decided to do something about it. Ladies and gentlemen, for your nearly guilt-free dining pleasure, I give you: Reduced Fat Fettuccine Alfredo with Grilled Shrimp and Broccoli.

This recipe makes 4 servings.

Begin preheating the oven to 150 degrees. When it has reached temperature, place four dishes inside to become warm while you prepare the food.


First, let’s brine our shrimp.


Place one pound of uncooked shrimp, ½ cup of kosher salt, and the juice of ½ lemon in a bowl with 2 quarts of water and let brine for 30 minutes.
  • The amount of water is important; if you use more or less, increase or decrease the salt and lemon proportionately.
  • Although other proteins – chickens, for example – are brined for several hours, avoid brining the shrimp for longer than 30 minutes. It's just how shrimp are.
Next, the broccoli.

While the shrimp are brining, cook a 10 ounce package of frozen chopped broccoli as per the directions on the package, and set aside.

Now it's time to get our pasta going.

Begin boiling a large pot of salted pasta water. (I like to use about a tablespoon of kosher salt per quart of water. You can use more or less to your own taste.) When it comes to a boil, begin cooking a 12 – 14 ounce box of fettuccine as per the “al dente” directions on the package.

Very important: after the pasta has finished cooking, reserve 1 cup of the pasta water before draining. We'll use this in the sauce.


To make the sauce:

Put ½ tablespoon of butter substitute and ½ tablespoon of olive oil into a skillet over a low heat until the butter substitute has melted.


Add 1 tablespoon of all-purpose flour and cook for one minute, stirring with a rubber spatula or wooden spoon to form a roux. When ready, the roux should be a light golden brown color. Add ½ tsp of kosher salt, 1 minced clove of garlic, the juice of one half lemon, and a pinch of nutmeg.

Add 1-1/4 cups of fat-free half-and-half, a splash at a time, whisking constantly; wait until each splash is completely incorporated before adding the next to prevent the half-and-half from separating.

Cook until thickened, about 3 minutes.


Add 1 cup of freshly grated parmesan and 1 tablespoon of dried parsley, and whisk for about a minute until the cheese has melted.


Whisk in 1/3 cup of pasta water. Add additional pasta water, up to another 2/3 cup, to get the desired thickness. Add salt and fresh-ground black pepper to taste.

Time for the shrimp!

Drain and dry the shrimp, toss lightly with a little olive oil.


Cook the shrimp on a grille pan until done. (There’s no need to season them, since they're already brined.)


Now let's put it all together!

Combine the shrimp, broccoli and sauce. Add the sauce and mix till well combined. Divide the pasta between four warmed plates and top with a little extra grated parmesan.

Serve with some garlic bread on the side (pictured at top), and/or a nice salad, and you’ve got a lovely (and guilt-free!) dinner indeed!

If you like what you see, we hope that you'll download a copy of the recipe by clicking HERE. And that you'll be sure to tell some friends!     

Thanks for visiting! Hope to see you next week for another tasty recipe. Till then, stay well, keep it about the food, and always remember to kiss the cook. ;-)


Saturday, April 21, 2012

For Earth Week: Reduced-Fat Planet Earth Sandwich Cookies with Blueberry Cream Filling

Want a cookbook-style copy of this recipe? No problem…just click HERE.

Saving the earth is usually considered a good thing. But when the earth in question is a delicious Reduced-Fat Planet Earth Sandwich Cookie with Blueberry Cream Filling, it’s best eaten, not saved.


These novel cookies not only taste great, they’re surprisingly easy to make. Kids will love them because they look fun and, well, because they’re cookies! Adults will love them because of the grown-up blueberry cream filling. (And because they look fun and are cookies, too! If they say it’s just the filling they’re drawn to, just nod your head politely to make it look as if you believe them.)

Some Cook’s Notes before we begin:
  • The cookie portion is made from a sugar-cookie dough. This article includes the sugar-cookie recipe I like to use, but if you already have your own favorite sugar-cookie recipe, feel free to substitute it.
  • If you prefer a cream filling other than blueberry, it’s no problem! Just substitute the fruit preserves of your choice for the blueberry preserves in the recipe.

This recipe makes about 18 large (3”) sandwich cookies, or 36 single-layer sugar cookies

First, let’s make our sugar cookie dough:

Sift together 5 cups of all-purpose flour, 1-1/2 tsp baking powder, and ¾ tsp salt.


In a separate bowl, beat 1-3/4 cups of sugar and 1 cup plus 2 Tbsp butter substitute till smooth and light in color. (Butter substitutes tend to be either firm textured or soft; choose a soft one for this, and don't leave it out to get to room temperature  as you would with full-fat butter.)


Mix 2 egg substitute and 1 tsp vanilla extract into the butter substitute mixture.


Separate the butter substitute mixture into 2/3 and 1/3 portions.


Mix 2/3 of the flour mixture and some blue food coloring into the 2/3 portion, and 1/3 of the flour mixture and some green food coloring into the 1/3 portion. (Because the dough is naturally yellow, for the blue dough it will be necessary to use a substantial amount of blue food coloring to overcome the green color that comes from mixing blue and yellow.)

Wrap the two batches of dough in plastic wrap and place in the freezer for 1 hour. (For working with butter substitute, I've found chilling dough in the freezer works better than chilling it in the refrigerator as you would with regular full-fat butter.)
 
While the dough is chilling, make the cream filling as follows:

Melt 1 cup of blueberry preserves and 2 Tbsp butter substitute in a medium saucepan over low heat.


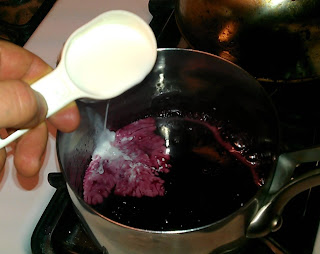
Mix in ½ cup of fat-free half-and-half, little by little, waiting till each addition is incorporated before adding more. (Adding it too quickly may cause it to separate.)


Simmer until the mixture is reduced by half, stirring very often avoid burning. Once the mixture is reduced, pour into a separate bowl and set aside until ready to use.

Prepare the “earth dough” as follows:

Cut the two chilled doughs in half, and keep each portion in the freezer until you’re ready to use it.

Break the green dough into small pieces and spread them out on a surface dusted with confectioner’s sugar.


Break the blue dough into pieces that are somewhat larger than the pieces of green dough. Place them in between the green pieces and use your hands to press them down so that they start to join together and start to resemble a flat earth-map.

Roll the dough out to about ¼” thick. (Covering it with wax paper while you roll the dough makes the clean-up easier later.) Using a 2-1/2” round cookie cutter, cut out rounds that look like earth globes. (After you’ve cut as many as you can, gently press the pieces together and roll it a second time to ¼” thick. You'll find the dough can be rolled a second time without over-developing the gluten and making the dough tough. Cut out more 2-1/2” rounds that resemble earth globes.)

Lay the cookies out on baking sheets lined with parchment or silicon sheets as shown in the photo above. Allow enough space in between for the cookies to expand to about 3”.

Bake at 375 degrees till firm, about 10 minutes, turning half-way. (As always when using two baking sheets, stagger them in the oven to allow the heat to circulate for more even baking.)

Let the finished cookies rest on the baking sheet for a minute or two, then remove to a cooling rack.


If you want to serve these as single layer sugar cookies, you’re done! To serve as sandwich cookies:

After the cookies and cream filling have cooled, place half of the cookies on the counter, flat side up.


Spread some filling on each of the cookies.


Place an unfrosted cookie on top of each, flat side down, to form sandwich cookies.


And there you have it. The world may not be your oyster, but – for Earth Week, at least – it’s your cookie, and I’d choose cookies over oysters any day!

Like what you see? For a notebook-ready, cookbook-style copy of this recipe, just click HERE.


Have a great Earth Week, and I look forward to seeing you again next week for another fun recipe! Till then, stay well, keep it about the food, and always remember to kiss the cook. ;-)

Saturday, April 14, 2012

Fruit and Nut Salad in a Spiced Wine Reduction

(To download a .pdf of this recipe, click HERE.)

Today’s recipe for Fruit and Nut Salad in a Spiced Wine Reduction was inspired by charoset, a delicious apples and walnut salad traditionally served as part of a Passover Seder. Since the time I was a child, it has interested me that people having charoset (pronounced char-OH-set, with the guttural ch as in “yecch!”) for the first time invariably single it out as the best tasting item on the table. And yet I have never seen it served except at Seders.

Friends, that’s about to change. Today’s recipe, a kind of charoset with an attitude, is meant for year-round use in any cultural setting.  (To paraphrase the old kosher hot dog commercial, there’s no such thing as a religious fruit salad.) The traditional sweet apples have been replaced with Granny Smith apples for their firm texture and tart taste, and balanced with pears. The customary walnuts are supplemented with almonds, and toasted for deeper flavor. Texture and flavor are added by using both dried apricots and raisins.

And then there’s the wine. Although you can use any red wine, the traditional choice is sweet and inexpensive Kosher concord grape wine as pictured. (Wine lovers, don’t be put off; while not all that good for drinking – and that’s putting it kindly – I’ve found this type of wine is surprisingly good as an ingredient in fruit dishes, desserts, and anyplace else where its high level of sweetness can serve a good purpose.) Rather than just adding the wine as is, this recipe makes it a spiced reduction to fortify the flavor, a key element to this recipe’s special taste.

(Note also that if you prefer not to cook with wine, grape juice is frequently used as a substitute.)

This recipe makes a little more than 4 cups of fruit salad.

Preheat oven or toaster oven to 350 degrees.

While the oven is preheating combine ¾ cup of sweet red wine, ½ teaspoon ground cinnamon, ½ teaspoon allspice, and ½ teaspoon ground ginger in a saucepan over low heat. Bring to a boil and continue to cook uncovered until the wine is reduced to about ¼ cup.
  • Hint: When making reductions, I’ve found a barbeque skewer marked with the original liquid depth and the desired reduced liquid depth to use as a kind of dipstick is very helpful.
Place ½ cup of chopped walnuts and ½ cup of chopped almonds on a baking sheet, and toast for a few minutes until the nuts are slightly browned and aromatic. Turn off the oven when done.

Combine 3 Tbsp of light brown sugar, 6 ounces chopped dried Mediterranean apricots, ¼ cup dark raisins, ¼ tsp salt, the juice and zest of one medium orange, 2 peeled and finely diced Granny Smith apples, and 2 peeled and finely diced pears in a bowl.
Add the toasted  nuts and the spiced wine reduction after both have cooled.


Mix well before serving. For best flavor, refrigerate the mixture overnight, and serve cold or room temperature.


As with any fresh fruit salad, this will hold for a couple of days. (Your family or guests will probably finish it all well before that!)

See you next week with another kitchen-tested, great-tasting recipe! Till then, stay well, keep it about the food, and always remember to kiss the cook. ;-)

(To download a .pdf of this recipe, click HERE.) 
  

Saturday, April 7, 2012

One-Pan Carrot Soup

When I tasted the hearty One-Pan Carrot Soup my wife made a while back, I knew the next time she made it I’d have to post the recipe here to share with the world.


As with practically any of her cooking, my responsibilities for posting the carrot soup are mainly following her around with a camera for photos and a clip-board and pen for putting the method into words. (My wife is a great instinctual cook who rarely uses recipes, particularly when making soup.) One of the hardest parts is documenting the quantities of ingredients, since she’s not big on measuring. For example, the recipe below includes what I’m calling 3 tablespoons of dried dill, which is actually my translation of what she called, “two palms full.” (My version does consider a correction factor for petite palms.)

Aside from faithfully documenting the process, my only contributions to this recipe were the grated parmesan topping and the beer batter rolls on the side.

(If you like this soup, you can check out another of her nothing-written-down recipes for Creamy Broccoli Soup.)


And now, here it is, One-Pan Carrot Soup, for your cooking and eating pleasure. This recipe makes four meal-size servings.

Put 1/8” water and 1 Tbsp butter substitute in a large skillet. Heat until the butter substitute melts.


Add 2-1/2 pounds of peeled whole carrots to the skillet and cover. Simmer until the water has evaporated to steam the carrots.


When the carrots are steamed and some are slightly caramelized, take them out of the skillet and set them aside.


In the same skillet, add 2 – 3 Tbsp olive oil, 2 rough-chopped onions and 3 rough-chopped stalks of celery. Cook uncovered until the onions are translucent.


Pushing the onions and celery to one side of the pan, put 2-3 Tbsp butter substitute and 2 Tbsp all-purpose flour on the other side. Mix the butter substitute and flour to form a roux. When it has cooked for about 1 minute, combine the roux with the onions and celery and add 1 cup of skim milk. Continue cooking while stirring constantly until the mixture has thickened.

Add the carrots to the skillet and mash them with a potato masher. (It’s ok if some of the carrots remain chunky; the mixture will eventually be pureed.)


Add 3 Tbsp dried dill, 6 regular or 3 large bouillon cubes, and 4 cups of water. (The bouillon cubes should be enough to require 6 cups of water normally; this recipe only uses less water because of the other liquid ingredients involved.)

Cook the mixture until it just starts to boil, then turn off the heat and puree with an immersion blender.


The texture should be a thick liquid with some small chunks.


Serve the soup in bowls with some good bread and topped with fresh-grated parmesan cheese.

Click HERE to download a cookbook-style copy of the recipe in .pdf format

Hope you enjoy this easy, delicious (and low-fat!) soup! And that you’ll visit again next week for another tasty recipe. Till then, stay well, keep it about the food, and always remember to kiss the cook. ;-)