Showing posts with label ravioli. Show all posts

Friday, October 26, 2012

Chicken Piccata Ravioli


To download a cookbook-style copy of the recipe for Chicken Piccata Ravioli, click HERE.

A meal of homemade ravioli can be as satisfying to make as it is to serve and eat. It also affords some great opportunities to be creative with your fillings and sauces.

With that in mind, today’s recipe takes Chicken Piccata, that simple and very delicious restaurant favorite of browned chicken topped with a white wine and lemon sauce (and that is often served over pasta), and uses it as the basis for a unique, fresh ravioli dish. It’s a simple idea – the chicken is used to make the filling, and the wine and lemon sauce is used to top the finished ravioli – that’s a whole new way to look at ravioli.

Some Cook’s Notes before we begin.
  • In the recipe below, we’ll be making our own pasta dough from scratch. It’s fun and not at all difficult, but if you still prefer not to make your own, store-bought wonton wrappers will work just fine.
  • There are many ways of rolling and cutting pasta dough for ravioli. In the recipe below, I hand rolled the dough and used a ravioli stamp, but if you prefer other ways – rolling with a pasta machine, cutting with round cookie cutters, using a ravioli attachment on a stand mixer, etc. – feel free. The right way is any way that works for you.
  • When we make the pasta dough in the recipe below, I combined the ingredients in a bowl. Some people do prefer the more traditional way of mixing the ingredients directly on the counter. As was the case with rolling and cutting the ravioli, there’s more than one way, and you should use any you prefer.

This recipe makes about 24 ravioli.

We’ll start by making the pasta dough. (Skip this step if you’re using wonton wrappers.)

In a bowl, combine 2 cups all-purpose flour; ½ tsp salt; and 1 tsp dried sage.  Make a well in the center of the mixture.


Add 1 tsp of olive oil and 3 egg substitute eggs.


Mix until a dough forms. (Add a little more flour if the dough seems too moist, but not more than 1 Tbsp.) Knead by hand or using the dough hook of a mixer for about five minutes until dough is smooth and elastic.

Cut the dough into quarters and wrap in plastic wrap. Let dough rest for at 20 – 30 minutes.


While the dough is resting, begin making the filling.

Heat 1 Tbsp of olive oil in a skillet over medium-high heat. Add 3 Tbsp chopped shallots or onions, and sauté until translucent but not brown.


Add ½ pound of ground chicken and ¼ tsp dried thyme, and cook until slightly browned. Add ¼ cup of dry white wine (Chardonnay or similar) and ¼ cup low-sodium chicken broth, and cook for about three minutes, stirring often.

Remove the chicken mixture from the heat and mix ¼ cup of plain, fresh bread crumbs.


Using a blender or food processor, grind the chicken mixture till it has a slightly coarse texture. Season with salt and pepper to taste. Transfer to a bowl, let cool, and mix in 1 egg substitute egg to make the filling.

While the filling is cooling, make the piccata sauce as described below.

Using the same pan you used to cook the chicken, reduce the heat to medium, and heat 1 Tbsp olive oil. When heated, sauté 2 chopped garlic cloves until aromatic, 30 seconds – 1 minute.

In a separate bowl, combine ¾ cup low-sodium chicken broth; 3 Tbsp fresh squeezed lemon juice; and ½ cup dry white wine.


Add the broth mixture and 2 tsp all-purpose flour to the pan, and cook until thickened, about 3 minutes, stirring often.


Stir in 1 Tbsp dried sage and 1 Tbsp capers. Cook another 2 – 3 minutes.


Stir in 1 Tbsp butter substitute, remove from heat, and set aside.


Now let’s make the ravioli! (Repeat the following steps for each of the dough quarters. Keep the unused dough covered to prevent drying out.)

On a well-floured surface, roll to a thickness of about 1/16”.


Cut into desired shapes.


Apply egg substitute to the edges of half of the shapes.


Place 1 tsp of filling on half the shapes.


Place an identical shape on top, pressing down onto the egg. Press down edges with a fork or fingers to seal.


If using a ravioli stamp, press out each ravioli. Cook in salted boiling water (usually about 7 minutes but check often for doneness) or freeze for later use.


To serve, plate the ravioli and top with the sauce. Garnish with parsley. Serve with a salad or vegetable side dish.
To download a cookbook-style copy of the recipe for Chicken Piccata Ravioli, click HERE.

Whether you’re making it for yourself or for company, this is a dinner you’ll be proud to serve. Bon appétit!

We hope you’ll visit here again next week for another kitchen-tested, home-cook ready recipe. Till then, stay well, keep it about the food, and always remember to kiss the cook. ;-)

Saturday, November 5, 2011

Cranberry Chutney

Welcome to new subscriber, My Loaves of Love. (Don’t you just love that name?) Great to have you here!

Chutney is a condiment originating in India but affectionately embraced in the United States and elsewhere. It has a jelly-like consistency, but firmer and chunkier, and can be sweet, hot and spicy, or a wonderful sweet-sour-savory flavor mix. (Today’s recipe, Cranberry Chutney, is an example of the sweet-sour-savory kind. In the photo, it's shown on fish with asparagus bundles and herbed roasted potatoes.)  The best part is that, for all their deep flavor, chutneys are very easy to make, a simple reduction of a few basic ingredients in a single saucepan.

Chutneys can be made from many combinations of things, many of which you might not ordinarily think of going together well. (The first chutney I ever tasted was made with mangos and artichokes.) Most are a combination of fruit, vegetables, sugar, herbs, spices, and an acid (usually vinegar). I chose cranberries (fresh ones, not the dried kind), but Cranberry Chutney should not be mistaken for cranberry sauce. Both have a sweet-sour quality, but the savory character of chutney really sets it apart as a great complement to pork, poultry, and fish. (It also works well as a spread on bread or cheese!)

This recipe makes about 2-1/2 cups.

Place a small, glass plate in the freezer for use later in checking the real thickness of the finished chutney. (This is for a great trick from the world of jellies and jams, and that regular KTC readers have seen before in recipes for fresh syrups.)

Set aside ¼ cup of raisins. Optional, but enthusiastically recommended, is adding just enough brandy to cover the raisins and letting them soak for at least 30 minutes.

Put 1 cup of sugar, 1 tablespoon ground ginger (or 2 tablespoons fresh), 1 teaspoon salt and ¼ teaspoon fresh-ground black pepper in a medium saucepan and stir to combine.
Add ½ cup of cider vinegar and stir to mix. Turn the heat on medium until the cider mixture just begins to boil.


Add 12 ounces of fresh cranberries, 1 medium onion (diced) and 4 cloves of garlic (minced). Stir to mix. When the mixture just starts to boil, lower the heat to a simmer.
Simmer the mixture uncovered till thickened, about 25 minutes.


Check the texture by putting a small amount onto the frozen plate.

When done, if necessary add salt, pepper and sugar to taste.


While we’re at it, here’s a bonus recipe you might like from an earlier post you may not have gotten to see: fresh-made three-cheese ravioli!


I hope you enjoy making and using Cranberry Chutney! Visit again next Saturday for another easy, kitchen-tested, low-fat recipe. Till then, stay well, keep it about the food, and always remember to kiss the cook. ;-)

Saturday, August 20, 2011

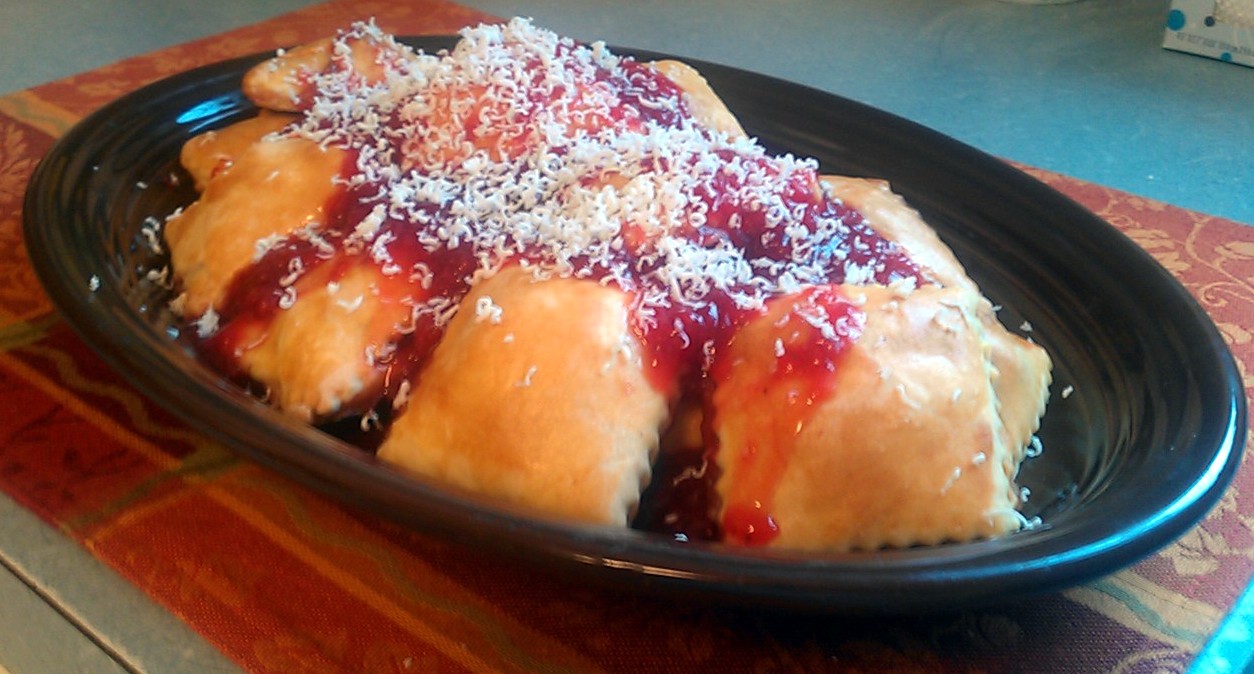
Strawberry-Rhubarb Pastry Ravioli


The origins of Strawberry-Rhubarb Pastry Ravioli go back several years. I was preparing a pie and had leftover dough trimmings. Such leftovers are normal, of course, but I was determined not to waste anything, even the scraps. I think when you make the dough yourself you feel a little parental toward it and want to give it every chance to make something of its life.

Whatever the reason, I took small roll-outs of the dough, placed some preserves on them, topped them with another small dough roll-out, and baked it till it looked something like a ravioli. They tasted pretty good. Elated and proud, yet disarmingly modest for someone who had just revolutionized the culinary world, I took time out from writing the speech I was going to give when awarded the Nobel Prize for Pastry to showed my great invention to my wife. She informed me that baking preserves between two pieces of pie dough was something mothers had been doing with small children to keep them occupied for about as long as there have been preserves, pie dough and, for that matter, small children.

Oh well, I thought. Back to the cutting board.

Despite the idea’s childish roots (or maybe because of them), it stayed in my head until, a couple of weeks ago, Facebook friend and, let me be sure to mention, award-winning and published baker Isabel asked me when I was next going to have a recipe for something sweet. It seemed a chance to explore the pastry ravioli idea again, this time bringing more experience to the process and taking it up a level or two. Experience, in this case, meaning:
  • Using a strawberry-rhubarb filling instead of jarred preserves;
  • Cutting the pastries with a ravioli cutter and topping them with fresh strawberry syrup made to resemble tomato sauce; and
  • Topping the “sauce” with shaved white chocolate to resemble fresh-grated parmesan.
I’ve always said one of my favorite ingredients is whimsy. Fun food tastes good!

This recipe makes about sixteen 2-1/2” pastries. You’ll need two pie doughs which you can either buy, make using your favorite recipe, or click on the link for a reduced fat pie dough that really works.

Start by hulling one pound of fresh strawberries and dividing them into two equal piles, one for the filling and one for the topping.

To make the filling, combine the following in a bowl, mix well, and cover and refrigerate until ready to use: ½ pound of the strawberries, finely chopped; 1-1/2 cups (about 1-1/2 large stalks) of red rhubarb, finely chopped; ¾ cup sugar; 1-1/2 tablespoons of corn starch; ½ tablespoon of all-purpose flour; ¼ teaspoon fresh lemon zest; ¼ teaspoon fresh lemon juice; ¼ teaspoon cinnamon; and ½ teaspoon vanilla extract.

Begin preheating the oven to 425 degrees.

On a floured surface, roll one of the pie doughs into a thin pastry. Being careful not to cut the dough, use a ravioli cutter to lightly mark where the dough will be cut into individual pieces. Lay out as many pieces as possible.

Draining each spoonful as much as possible, place about a teaspoon of filling onto the center of each marked piece. (You will probably have filling left over.) Place a small dab of butter substitute on top of each mound of filling.

On another floured surface, roll out the other pie dough to the same thickness as the first. Place the second dough on top of the first and lightly press down around the mounds formed by the filling.

Brush an egg wash (1 tablespoon of water mixed with either one egg substitute egg or 1 beaten fresh egg) to the top dough. With the mounds as a guide, use the ravioli cutter to cut separate pastries that look like ravioli. Place the pastries on a parchment-lined baking sheet.

Bake the pastries at 425 for 10 minutes. Lower the temperature to 375 degrees and bake until lightly golden, about 35 minutes, turning the baking sheet half-way.

While the pastries are baking, let’s make our strawberry “sauce” topping.

Place a small glass plate in the freezer. (This method of checking the final cooled thickness of the topping while it’s still hot comes to us from the world of jelly-making.)

Place ½ cup of sugar and the juice of ½ lemon into a medium saucepan. Mix until combined, then heat over a low heat until the sugar mixture is melted. (Keep an eye on it; you don’t want this to burn.)

Crush the remaining ½ pound of hulled strawberries by hand into the saucepan. (Crushing by hand will give the finished topping a lightly chunky appearance similar to tomato sauce.) Add a pinch of nutmeg and ½ tablespoon of butter substitute. Cook the mixture down to the desired “sauce” thickness. (You can check the thickness of the cooled liquid by placing a few drops of the hot liquid onto the plate you put in the freezer and letting it cool.)

When the pastries and topping are done, let them rest until cool.

The cooking is done; now it’s time for the stagecraft.

After the pastries and topping have cooled, lay the pastries on a serving plate similar to ravioli and top with the strawberry “sauce.” Shave white chocolate on top of the sauce, giving it an appearance similar to parmesan cheese on tomato sauce.

As always, if you prefer a cookbook-style, notebook-ready version of this or any other recipe you see here, just give a holler (along with your e-mail address) and I’ll get it right out.

See you next week with another recipe for something tasty and reduced fat! Till then, stay well, keep it about the food, and always remember to kiss the cook. ;-)

Saturday, August 21, 2010

The Raviolo and I

Raviolo: a word so obscure, even Microsoft Word's spell-checking software doesn’t recognize it. Its better know plural, of course, is ravioli. By either name, though, this wonderful cheesy-stuffed pasta pillow is not only delicious to eat; it’s also easy and fun to make. If you’ve never made it (or any other fresh pasta) before, I invite you to try now; you’re in for a real treat, not to mention a real sense of accomplishment once you’ve seen and tasted what you made. And you won’t need a pasta machine. (I didn’t even own one until earlier this week, but that story’s a future post.)

My introduction to home-made ravioli was a pasta class I took several years ago at the culinary arts school of a local community college.  The pasta chef teaching the course excitedly brought out the school’s brand new restaurant-grade pasta machine, an impressive multi-gadgeted electric device only about the size of a household toaster but costing a couple of thousand dollars. Or at least it was impressive until the machine started shutting down from the motor overheating every time someone tried to use it. A few in the class decided to stay with it, enduring a continuous cycle of press, overheat, wait for it to cool down and then try turning it on again. I opted for the other type of pasta maker, the round wooden kind that never overheats or breaks down, also known as a rolling pin. That’s one of the most encouraging things about making pasta; people did it centuries before any of the fancy kitchen equipment we have today was invented.

Both the pasta dough and the filling are easy to make. The dough described follows a traditional recipe. The filling features Fontina cheese. I wasn’t familiar with it until recently, when I heard Bobby Flay make an off-handed remark on a Throwdown rerun about Fontina being one of the best cheeses there is. Once I heard that, I had to get some and find out what he was talking about. My first taste of its wonderful Italian aura immediately screamed ravioli.

The dough for about two dozen ravioli (more or less, depending on how big you make them) begins in a large bowl into which you put 2 cups of all-purpose flour and ½ teaspoon of salt. Mix them until they’re combined and then form a well in the middle of the flour-pile. Into the well, put three egg-substitute eggs (or, if you like, three real eggs), and a teaspoon of olive oil. Mix them together using your hand, first combining the wet ingredients with the inner-most part of the flour pile, and gradually working your way outward until all the flour is incorporated to form a dough.

[Before we go further, I must add the following remark. There’s a good chance you’ve seen someone make pasta dough as described above, except without the bowl; in other words, with the flour piled directly on the kitchen counter. That’s the most authentic way, but it’s hard to do with only two cups of flour without making a mess once you start mixing in the wet ingredients. If you really want to try it, I suggest waiting until you’re making at least a double-batch of dough.]

Knead the dough for four to five minutes until it’s smooth and elastic, flouring your work surface as necessary during the kneading. After kneading, cut the dough ball into quarters. Wrap each quarter in plastic wrap and let them rest for 20 minutes while you mix the filling.
The filling, though delicious, couldn't be simpler to make.

Just put the following ingredients into a bowl and mix well until they’re combined: 1 cup of Ricotta cheese, 3/4 cup of grated Parmesan cheese, 3/4 cup of fresh grated Fontina cheese, 1 egg-substitute egg, 2 tablespoons of fresh chopped parsley, ½ teaspoon of garlic powder, and salt and pepper to taste.

So now you’ve got your dough, and you’ve got your filling. Next stop: home-made ravioli!

Beginning with the first quarter-portion of dough (and keeping the remaining portions covered to keep them from drying out), roll the dough out on a well-floured surface into something as close as you can to a square about 12” on each side and 1/16” thick. Using a cooking cutter, cut out as many pieces as you can. (Remember, each raviolo will require two of the pieces.) Place a generous teaspoon of filling on the centers of half of the pieces; using your finger, coat around the edges of those pieces with egg-substitute (or a real egg, beaten) and place an identical dough shape on top. Press the edges down onto the egg with your finger, then with a fork to seal. Done right, the egg will keep the ravioli from opening up later in the cooking water.
And that's it! As you finish the ravioli, either put them aside (if you’re going to cook them right away), or place them on a baking sheet covered with parchment for freezing later. In either case, cover them to prevent drying out while you repeat the above with each of the remaining pasta quarters.

Remember that fresh pasta generally cooks faster than the packaged kind. The ravioli will generally cook in about 7 minutes, but check them often for doneness. If you choose instead to freeze them, put the ravioli in the freezer on the baking sheet first; once they’re frozen, put them together in a plastic bag for storage. (If you put the ravioli together in the bag before they’re frozen, they’ll likely stick together.)

Once the ravioli are cooked, all that remains is to top them off with your favorite sauce and some parmesan, and to enjoy the taste of fresh-made ravioli – and the fantastic feeling of having made them yourself!
For a cookbook style, notebook-ready copy of this or any other recipe from this site, just drop me a line and I’ll get it right off to you. (I also hope to get a video of this recipe finished and available on You-Tube soon...stay tuned!)

Thanks for visiting! Till next week, stay well, keep it about the food, and always remember to kiss the cook. ;-)