To download the recipes used to make Mini-Layer Cake
Cupcakes with Coconut Marshmallow Cream Frosting and Strawberry Filling, click
on the following links:
- For the Strawberry Filling recipe, click HERE.
- For the Marshmallow Cream recipe, click HERE.
- For the Coconut Frosting recipe, click HERE.
- For the Cupcake recipe, click HERE.
- For the Mini-Layer Cake Assembly recipe, click HERE.
 A warm Kissing the Cook greeting to new follower Grinelda.
Welcome!
A warm Kissing the Cook greeting to new follower Grinelda.
Welcome!
Sometimes, a recipe idea evolves over time, becoming more
and more refined as it develops. And sometimes, you’re sitting around one day
thinking, “I haven’t had cupcakes for a while. Think I’ll work on making some.”
This recipe came from the second one.
The concept is simple: making cupcakes that are
actually miniature layer cakes. And although it looks like a long recipe,
that’s just because I’m describing here how to do everything from scratch: the
preserves for the filling; the frosting; the marshmallow cream used to make the
frosting; and the cake itself. Recognizing that not everyone is as obsessive
as I sometimes am about things like that, however, I’ve broken the recipe below down
into parts to make it easier for you to use ready-made items. If you prefer, any or all of those items can be purchased instead of made from scratch, and the making of this recipe will be made faster and simpler. It’s completely
up to you.
On a related note, some readers may be a bit fearful about forming and frosting
a miniature layer cake. No need to worry. I don’t have much experience with cake myself, and it still worked just fine. If you are an experienced cake maker who
can frost a cake more beautifully than the basic way I’ve shown here, think of
that as an extra bonus.
An extra benefit of this recipe is that it actively
illustrates a couple of very useful techniques for reducing the fat in baked
items while keeping a good texture and taste. Butter substitute and egg
substitutes can be used, but they must be used correctly.
- For butter substitute, this means using a firm
textured brand. (I used Smart Balance, but there are other good ones as well.)
A firm-textured substitute will stand up to being left out to get to room
temperature, an absolutely critical step in making the cake and the frosting.
The softer textured ones can start to break down at room temperature. And, as always with butter substitutes,
adjust the quantity to ¾ of the amount of full-fat butter you’d use. (For
example, 4 Tbsp of full fat butter would be replaced by 3 Tbsp of butter
substitute.) This is because butter substitute has a higher moisture content.
- To replace eggs, packaged egg substitute works
well in many ways. My main issue is that it doesn’t fluff the same way fresh
eggs do when cooked. You can offset this by replacing one of the egg substitute
eggs with two fresh egg whites beaten into beautiful fluffiness. Just be sure
to use fresh egg whites; the packaged ones I’ve tried using don’t fluff when
beaten.
I hope you will give this recipe a try. In spite of the fact
that, as usual on this site, the fat in the recipe has been greatly reduced,
the results are delicious.
This recipe makes 10 mini-layer cake cupcakes.
 In preparation for some things we’ll having coming up, set
the following out for an hour or two to get to room temperature. (Don’t skip or
short-cut this step; it may seem like a small item, but it’s the difference
between the frosting and cake recipes working and not working.)
In preparation for some things we’ll having coming up, set
the following out for an hour or two to get to room temperature. (Don’t skip or
short-cut this step; it may seem like a small item, but it’s the difference
between the frosting and cake recipes working and not working.)
- Frosting: ½ cup of firm-textured butter substitute
- Cake: 2 egg substitute eggs, 2 fresh eggs, 1/2 cup of firm-textured butter substitute, and 2 Tbsp skim milk.
With those ingredients set out on the counter to reach room temperature, we’ll start by making the strawberry jam filling. (Although I
like to think this jam is better than the kind in a jar, skip this part if you
prefer to buy some instead.) This makes about pint of jam, which is much more
than you’ll need for the cakes. It’s just easier to make more, and also gives
you a delicious jam to have on your toast!
Place a small, glass plate in the
freezer.
 In a medium saucepan, combine
1-1/2 cups of granulated sugar, and the juice and zest of 1 lemon. Stir till
combined, then cook over a low heat until the sugar is dissolved.
In a medium saucepan, combine
1-1/2 cups of granulated sugar, and the juice and zest of 1 lemon. Stir till
combined, then cook over a low heat until the sugar is dissolved.
 Add 1 pound of chopped, hulled strawberries, a pinch of salt, and ¼
tsp of dried rosemary, and continue to cook over low heat.
Add 1 pound of chopped, hulled strawberries, a pinch of salt, and ¼
tsp of dried rosemary, and continue to cook over low heat.
The strawberries will gradually break down as the mixture cooks and
thickens. Cook with very little stirring.
 When a small amount of the liquid gels on the frozen plate, the jam is
ready.
When a small amount of the liquid gels on the frozen plate, the jam is
ready.
 Place in a jar and refrigerate until needed.
Now we’ll make the marshmallow cream that we’ll use later to
make the frosting. (You’ll need a candy or frying thermometer for this. Skip
this part if you prefer to buy a jar of marshmallow cream.) This makes a little
more than 2 cups of marshmallow cream, which is the amount we’ll need for the
frosting.
 In a mixer bowl, beat 2
fresh egg whites, a pinch of salt, and a pinch of cream of tartar until fluffy. Add 2 Tbsp of granulated
sugar to the egg white mixture and continue beating until peaks that are a
little firmer than soft peaks form.
In a mixer bowl, beat 2
fresh egg whites, a pinch of salt, and a pinch of cream of tartar until fluffy. Add 2 Tbsp of granulated
sugar to the egg white mixture and continue beating until peaks that are a
little firmer than soft peaks form.
 In a small saucepan, mix
1-1/2 Tbsp water, ½ cup light corn syrup, and 6 Tbsp granulated sugar together.
Using a candy or frying thermometer, cook over medium heat until it boils and
comes to 246 degrees (what candy makers call “firm ball”).
In a small saucepan, mix
1-1/2 Tbsp water, ½ cup light corn syrup, and 6 Tbsp granulated sugar together.
Using a candy or frying thermometer, cook over medium heat until it boils and
comes to 246 degrees (what candy makers call “firm ball”).
With the mixer on low,
drizzle the syrup into the beaten egg white mixture.
When all the syrup has
been added, increase the speed to high and beat until fluffy, about 5 to 6
minutes.
Cover and refrigerate the
marshmallow cream mixture to cool.
After the marshmallow cream mixture has cooled, use it to
make your frosting. (Skip this step if you’re using a prepared, packaged
frosting.)
 Using a mixer, blend 2 cups of marshmallow cream and ½ cup
of room temperature butter substitute until smooth.
Using a mixer, blend 2 cups of marshmallow cream and ½ cup
of room temperature butter substitute until smooth.
Add 1 tsp vanilla, 1-1/2 cups of confectioner’s sugar and ½ cup of
untoasted coconut flakes and beat till mixed. (Optional: If desired for a
looser texture, also add 1 – 2 Tbsp of skim milk.)
Cover and refrigerate until ready to use.
Now we’ll make our cake. (If you’re using a packaged cake
mix, make the simple syrup and then skip down to where we pour the batter onto
the baking sheet. Just make sure you have enough batter for 12 regular
cupcakes.)
 Prepare a simple syrup by combining ½
cup of water and ½ cup of sugar in a small saucepan. Bring to a boil, then set
aside to cool.
Prepare a simple syrup by combining ½
cup of water and ½ cup of sugar in a small saucepan. Bring to a boil, then set
aside to cool.
Preheat oven to 400 degrees.
 Combine 2 fresh egg whites, a pinch of
salt, and a pinch of cream of tartar in a bowl and beat until fluffy.
Combine 2 fresh egg whites, a pinch of
salt, and a pinch of cream of tartar in a bowl and beat until fluffy.
Combine ¾ cup sugar and ½ cup
room temperature butter substitute in a mixer and beat together till creamy.
(Be careful not to over-mix.) Add 2 egg-substitute eggs; 1 cup all-purpose
flour; 3/4 tsp baking soda; 1-1/2 tsp baking powder; 1-1/4 tsp vanilla extract;
and 1 Tbsp skim milk, and mix until a smooth batter forms.
Fold in the beaten egg whites.
 (If you’re using a packaged cake mix, here’s where you’ll
resume the recipe.) Pour the batter into a 9” x 14” x ½” baking sheet that has
been coated with butter substitute and floured. Use a spatula to spread the batter.
(If you’re using a packaged cake mix, here’s where you’ll
resume the recipe.) Pour the batter into a 9” x 14” x ½” baking sheet that has
been coated with butter substitute and floured. Use a spatula to spread the batter.
Shake to make the batter even within the baking sheet.
 Bake until golden brown, about 15 minutes, turning the pan
around halfway through for more even baking.
Bake until golden brown, about 15 minutes, turning the pan
around halfway through for more even baking.
Let cool for ten minutes on the baking
sheet, then turn over onto a cooling rack. (Cooling the cake upside down will
also help flatten it.)
When the cake has completely cooled,
use a 2-1/2” round cookie cutter cut the cake into circles. (You should be able
to get 20 circles if you plan it right.) Each circle is going to be one of the
layers of the cake.
To assemble and frost our mini-layer cake cupcakes, repeat the following steps for each mini-layer
cake.
 Toast about a cup of shredded coconut.
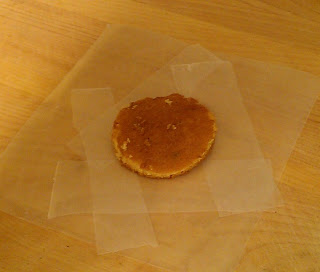
Place a 6” square of wax paper or parchment on the work surface.
Put a dab of frosting in the middle. This will hold the cake in place while you
work with it. It will also allow you to rotate the cake as necessary to make
applying the frosting easier.
 Place one of the cake circles on the dab of frosting. Place
additional strips of wax paper or parchment under all the bottom edges of the
cake to keep the wax paper square clean while you frost the cake.
Place one of the cake circles on the dab of frosting. Place
additional strips of wax paper or parchment under all the bottom edges of the
cake to keep the wax paper square clean while you frost the cake.
 Brush some of the simple syrup on the top surface of the cake.
Place some of the frosting in a piping bag, or a sealable plastic
bag with a corner cut off. Place a ring of frosting around the edge of the
cake. (This will help keep the filling from oozing out, and will provide
additional support when the top layer is applied.)
 Place some of the filling on top of the cake, inside the edge created
by the frosting. (About ½ tsp will probably be enough.)
Place some of the filling on top of the cake, inside the edge created
by the frosting. (About ½ tsp will probably be enough.)
 Place another cake circle on top to form the upper layer.
 Lightly brush the top of the upper cake circle with simple syrup.
Place a dollop of frosting in the center of the cake. (Don’t worry
about the sides just yet. This step is only for the top.)
Using a spatula or butter knife, spread the frosting out from the
center till the top is covered. Bring the frosting slightly beyond the edge of
the top layer.
To do the sides, frost about ¼ of the cake at a time. Similar to
how you did the top, apply a dollop of frosting and spread it over the area.
Using the wax paper square to turn the cake, work your way around
the sides until the entire surface is frosted.
Apply toasted coconut or other garnish to the iced cake.
After removing the wax paper strips, set aside on a tray to
refrigerate and firm up the frosting.
To download the recipes used to make Mini-Layer Cake
Cupcakes with Coconut Marshmallow Cream Frosting and Strawberry Filling, click
on the following links:
- For the Strawberry Filling recipe, click HERE.
- For the Marshmallow Cream recipe, click HERE.
- For the Coconut Frosting recipe, click HERE.
- For the Cupcake recipe, click HERE.
- For the Mini-Layer Cake Assembly recipe, click HERE.
You’re now ready to wow your family or guests with these
tasty (and just a bit whimsical) dessert cakes!
Please visit again next week for another (and, I promise,
shorter!) delicious, home kitchen-tested recipe. Till then, stay well, keep it
about the food, and always remember to kiss the cook. ;-)
 Although
last week’s recipe was for a delicious dessert pastry, if there’s one thing
I’ve learned while doing this site, it’s that people have a special fondness
for sweet treats. This week we’ll do another, a very special cupcake that was
inspired by my favorite dessert.
Although
last week’s recipe was for a delicious dessert pastry, if there’s one thing
I’ve learned while doing this site, it’s that people have a special fondness
for sweet treats. This week we’ll do another, a very special cupcake that was
inspired by my favorite dessert.Drain two 8 ounce cans of crushed pineapple in juice well, retaining the juice. Set the pineapple aside.

Dissolve 1 packet (1/4 ounce) of unflavored gelatin (Knox or similar) in the juice.

Put two egg substitute eggs in a bowl. Add 2/3 cup sugar, 1-1/2 Tbsp flour and ¼ tsp salt, and 1/3 cup of skim milk and mix well to combine.

Heat one additional cup of skim milk in a double-boiler.

When the milk is heated, add the egg mixture to it, stirring constantly until thickened into a custard.


When the custard mixture has cooled, add the pineapple.

Gently fold 1-1/3 cups of fat-free whipped topping. Refrigerate for several hours (overnight is best) until the custard is firm.

Begin preheating the oven to 350 degrees.

Blend 7 Tbsp of softened, firm textured butter substitute with 2/3 cup sugar in a bowl. Add 2 egg substitute eggs and mix well.

Sift 2 cups all-purpose flour, 1 Tbsp baking powder, and ¼ tsp salt into the bowl and mix to combine.

Mix in 1 cup of the custard and 1 tsp vanilla.

Put cupcake liners in a cupcake baking pan. Fill each of the cupcake liners 2/3 full.

Bake for 15-20 minutes, turning the tray half-way for even baking. Set aside and let cool completely before frosting.

In the bowl of a double-boiler, mix 4 large egg whites, 2/3 cup sugar, 1 tsp vanilla, a pinch of cream of tartar, and a pinch of salt. Set the bowl onto the double boiler and continue mixing until the mixture is hot and the sugar has dissolved.

Transfer the mixture to a stand mixer and, using the whisk attachment, beat at high speed until the meringue holds stiff peaks. (This will take several minutes.)

Preheat the broiler to high.


Fill each cupcake with the custard.

Cut the top off of each core and use it to plug the opening in the cupcake. (Set the rest of the core aside for snacking!)

Cover the top of the cupcake with meringue frosting.

Place the frosted cupcake under the broiler only long enough for the meringue to start to brown, about 2 – 3 minutes.


